Nothing to see...

A simple blog about all things in the world that is ridikulouse.

Technological steps, are man kinds greatest achievements

Not a Fighter, but a lover of Tech.

Love of the internet

The Internet is the final frontier for open connected networks, it promotes speech and advances knowledge for any mere person. The internet is fast becoming a need rather a want, and it is recognised by the UN as a necessity for the modern person.

Photography

Photography is more than just Art and expression, it is the manipulation of the light and provokes emotion and memories.

Have a look around

The articles on this blog represent my thoughts and views at the time of writing, I can always change my views through further education...please don't hold me against my views. Some of the articles have been written to assist anyone else with similar issues - it also helps me to remember. Hope you get something out of this.

Tuesday, July 9, 2019

Installing Third Party Applications on your Asuswrt-merlin router

If you have the Asuswrt-merlin router, then you have a world of possibilities unlike before.

In order to install third party applications you will need to enter the world of Entware. Entware is a software repository for devices such as routers.


To get into the world of Entware you will need to :

1. Be comfortable with using SSH
2. Have a USB flash drive/disk connected to your router.

For 1 - Turn on SSH on your router. You can enable this under Administration > System > Enable SSH. I would enable this for LAN Only at this stage. To connect to your router via SSH use a SSH client or your terminal (MACOSX, Linux), and type in "ssh admin@routerip". Enter your password and if it is your first time trust the connection.

For 2. Get a USB disk, format it to ext4 and pop it into your router. If your router doesn't mount the drive then check the system log to see what the error is. If the error is regarding features not being supporter then you might need to format the drive on the router - see my other article regarding this.

Now, step 1 is to install amtm.

1. log in to your router via ssh.
2. curl -Os https://raw.githubusercontent.com/decoderman/amtm/master/amtm && sh amtm 
3. amtm should load, goto install scripts then install Entware
4. once you have entware installed you can exit amtm, you can always come back to amtm by typing "amtm".


Looking at the available packages on entware
opkg list

Installing a package
opkg install <package_name>

Removing a package
opkg remove <package_remove>


Asuswrt-merlin mounting a USB device

So you've formatted your USB drive to ext4, stuck it into your router and your router recognises the plugged in USB device but it sez that it is unmounted. What gives ?


Well, first step is to check the system logs (see the left hand side menu options).

If the logs states something like "couldn't mount RDWR because of unsupported optional features" then most likely what's happened is that you've formatted your USB drive on your computer which is supporting features than what can be recognised by your router.

A simple way to fix this is to format it on the router - follow these steps:

1. Enable SSH on the router (Administration > System > Enable SSH - enable Lan only).
2. Open up terminal or an SSH client and fire the following command "ssh admin@yourrouterip", and enter your password. If it is your first time then it may ask you a couple of questions.
3. Run the command "mke2fs -t ext4 /dev/sda1"  asssuming that /dev/sda1 is where your drive is mounted. It will ask you whether you are sure, if you are then type "y" and it will proceed to format the drive to ext4.


At this point you can manually mount the usbdrive using mount .


Thursday, April 25, 2019

Video editing in linux

My primary desktop for development is now Linux desktop. I've got it running on my laptop's, and computers with various distros (Ubuntu being used primarily with Gnome).

Although I've been using Linux since the 90s, Windows has always existed. However, with vscode and online application like gdocs etc... I've managed to use Linux as my primary os. The question of Linux not having the software to support everyday use was finally busted. I became very adapted to using Linux, and used the alternative software such as gimp etc... For the various tasks that I needed to run.

However, today I'm finding myself repartitioning my HDD so that I can install windows. As much as I didn't want to return to windows, I'm finding that the question of adequate software has come up again and in this case the question of premium video editing software is just not available in Linux.

Sure there's kdenlive, and the Devs have done a great job with it. However, it's definately not comparable to something like Adobe's product or Apple's final cut Pro.

With Adobe dragging their heels in offering the creative suite on Linux, and Apple... Well I need to buy some over priced piece of kit just to use final cut Pro.

I looked everywhere for another alternative, such as cloud editing etc.... However nothing was available. Untill I came across DaVinci Resolve. This was the first time I have heard of it, however, a quick YouTube search shows a vast amount of videos dedicated to Resolve, which was perfect.

Resolve is offered on OSX, Windows, and Linux. Well, it's offered for CentOs and RHEL, for my use I had to run through some hoops just to get it installed on a Ubuntu machine

Looking through the videos this looked perfect for what I needed, something thats truly comparable to the premium products (nb: Resolve is a premium product with a free offering). The tutorials of effects etc ... Was perfect and looked very easy to use. Unfortunately, the videos were as close as I got to running it on my machine using Linux. Sure, the installer was converted to Deb package and I managed to install it successfully. Furthermore, I was able to launch it to get the introductory wizard. I managed to go through some of the key features and set up my keyboard layout and videos folder... And then nothing. A big fat nothing.

I was soooo close, and Im greatful that such a software is being made available for Linux and at a great price. I would like to support the company for their efforts and encourage for them to continue, and for this reason I'm installing windows so that I run resolve.


Friday, August 10, 2018

Trying out Ionic 4


Ionic 4 is now in Beta which brings breaking changes to your application - you can read about the benefits that Ionic 4 brings to the table here. This article will be a living document where I'll cover my experiences with Ionic 4, so please be prepared for new information to be added to this article and information to be removed (if it is not valid). .

Ionic 4 Documentation

Since Ionic 4 is in early beta there is very little documentation available and the official documentation is no where near as complete as what I was used to with Ionic 3. Since I mainly use Angular for my frontend development, the main change with the official documentation is the lack of angular-ish documentation. The main reason as I feel the reason behind this is because Ionic 4 is intended to be framework agnostic, allowing it to be used with a wide variety of frameworks.

Ofcourse, this means it makes my life harder. At present the documentation for Ionic 4 is in beta, however, the documentation site is badly missing search features. Which makes migration for early adopters a nightmare of manually reading through documentation. If the ionic team are reading this, I would encourage you to apply search facilities for the Ionic 4 documentation to allow a smoother transition between Ionic 3 to 4.

Installation 

To get started with Ionic 4 you simply have to get the CLI updated to v4.

npm install -g ionic

Next, to use the new templates you need to use --type=angular at the end. I.e

ionic start myapp --type=angular


Migration from v3 to v4

If you are that way inclined, you start migrating your v3 project to v4. The way that I had migrated to v4 is manual migration, instead of using tools. This allowed me to understand the breaking changes and what was changing from v3 to v4. This is where the reliance of the community, stackoverflow, and the documentation came in handy.

To do the mannual migration, you need to first copy your current project to a new directory. Next use the CLI to create a new project template :

ionic start <myapp> --type=angular

Once your template of your app has been created using Ionic 4, you can start by slowing migrating your project across. To do this I opened two copies of my IDE (in my case I use Visual Studio Code) and generate the pages/providers/services etc...

Please note... Ionic does provide a migration linter that can warn and sometimes fix the errors.

Breaking Changes


Where's the Providers

In Ionic 4 along with Angular 6, providers as knew them are now called services (as we knew them), so instead of doing :

ionic g provider <providername>

use

ionic g service <servicename>

What happened to ionic-angular import ? 

The import of NavController etc... from ionic-angular now needs to be imported from @ionic/angular. Therefore your import statement will be :

import { NavController } from '@ionic/angular';

What happened to IonicPage ?

I used IonicPage to do lazy loading in Ionic v3, this is no longer required. See navigation below.

Is NavParams still required ? 

NavParams can still be imported from @ionic/angular however, I haven't found that I have needed to use it. Instead I had rolled my own singleton service pass data between components, services, and pages.

What happened NavController ? 

NavController is still what you use to move from one page to another, however, in Ionic v3 we used .push and pop() method (push to move forward, and pop to move back). This is theoretically still the same, however, the navController has changed to .goForward() and goBackward. The changes also means that the navigation is handled using angular routing.

Check out src/app/app-routing.module.ts if you used the cli to generate the pages then a route will automatically generated within app-routing.module.ts. This will be an entire article by itself, however, for the time being to get yourself moving quicking in your migration check out what the cli and the template have generated for the routes and familiarise yourself with it.

The NavController.goForward method takes a string as a path which is the routing path.

So if you have route about  in your routes, then you would use NavController.goForward as

navController.goForward('/about');

Where is the back button in the pages ? 


In Ionic 3, the back button is automatically added to the pages. When you are manually migrating from v3 to v4 you may have noticed that the pages that you are generating doesn't have a back button. You will need to manually add these in if you want them (I'd guess you do).

My buttons don't render properly 


In Ionic 4 the html element for a button is ion-button, in v3 you may have had something like this :

<button ion-button (click)="myclick()">Click My Button </button>

this button should now be written as

<ion-button (click)="myclick()">Click My Button</ion-button>


Sunday, February 25, 2018

VisualStudio Code Hide JS Files

If you are working with Visual Studio Code and working with Typescript you'll soon notice that you are cluttered with JS files that are equivalent to your typescript file (these are the compiled/interpreted versions).

To get some order in your workflow, its often to get them out of the way and you can do this by editing the settings. To do this first open settings via File > Preferences > Settings  or use the keyboard combination CTRL + ,

Once your settings is opened simply place the following lines

"**/*.js": {"when": "$(basename).ts"},
"**/*.map": {"when": "$(basename).map"}

My whole file looks like this :

{
"files.exclude": {
"**/.git": true,
"**/.DS_Store": true,
"**/*.js": {"when": "$(basename).ts"},
"**/*.map": {"when": "$(basename).map"}
}
}


This doesn't hide all js files, only the files which have a typescript file.

Saturday, January 27, 2018

Possible solutions to getting react native app built

This document is a work in progress, I'm documenting the errors and pitfalls of developing in react native under Ubuntu. This is documented in the hope that someone finds this useful or if I need to refer to this again at some point in the future.

I am by no means an expert in this, I'm documenting what I have encountered and what had worked for me. I only advise that you can try these out at your own risk, as I cannot accept any responsibility.

Issue: Could not determine java version from '9.0.1'.


Solution :
From your project directory navigate to the directory "android/gradle/wrapper" and edit the file gradle-wrapper.properties and update the distributionUrl to the following :

distributionUrl=https\://services.gradle.org/distributions/gradle-4.3-rc-2-all.zip

Issue: Sdk location not found


Solution : From your project directory navigate to the android directory and edit the file local.properties (create it if it isn't there)

sudo nano local.properties

then enter the following line and replace <username> with your username

sdk.dir = /home/<username>/Android/Sdk

Issue : Failed to notify project evaluation listener.  javax/xml/bind/annotation/XmlSchema


Solution : Downgrade from Java 9 to Java 8

sudo apt-get remove oracle-java9-installer
sudo apt-get install oracle-java8-installer


if it comes back with an error for oracle-java7-installer then run the following command:

sudo dpkg -P oracle-java7-installer
sudo apt-get -f install 


Issue : ERROR: JAVA_HOME is set to an invalid directory: /usr/lib/jvm/java-9-oracle


Solution : 

find the java location using 

readlink -f $(which java)

copy the path without the bin/java at the end and run this command and paste the path 

export JAVA_HOME="<path>"

Issue: The SDK Build Tools revision (23.0.1) is too low for project ':app'. Minimum required is 25.0.0

Solution : 

from your project file goto android directory and edit build.gradle file and insert the following :

subprojects { subproject ->
    afterEvaluate{
        if((subproject.plugins.hasPlugin('android') || subproject.plugins.hasPlugin('android-library'))) {
            android {
                compileSdkVersion 25
                buildToolsVersion "25.0.1"
            }
        }
    }
}

Issue: /bin/sh: 1: adb: not found


Solution : 
Update your path to point to your platform tools


Issue: Double Tap R to reload - How? 


Soution : I used CTRL + M, and menu shade will be displayed where you can choose to reload. 


Tuesday, January 9, 2018

React Native CLI Commands

This will be updated with react-native cli commands that I come across as my reference:

Creating a project 

react-native init <project_name>

i.e react-native init helloworld

The first time you run this command it will take a little while to download all the dependencies for your project.

Run App in IOS 

Execute this in your project directory (i.e cd helloworld)

react-native run-ios

Run App in Android 

Execute this in your project directory (i.e cd helloworld)

react-native run-android


.


Developing with React Native on Ubuntu 17.04


I wanted to try out developing mobile applications using react native. React Native, if you are not aware is a framework that was developed by facebook that provides a mechanism to write both Android and IOS applications using javascript as a native application.

Unlike a cordova application which is essentially a hybrid application that essentially runs in a webview, a React Native app runs native with native performance and native flexibility all while using javascript.

Furthermore, React Native also has a vibrant community of developers who are happy to help and plenty of libraries.

My development system is Ubuntu 17.04, and although there are plenty of documentation on how to get this to work in Windows and Mac the information for Ubuntu was quite scarce. For this reason I decided to write this to help someone out.


Install NodeJs


sudo apt-get install -y build-essential

curl -sL https://deb.nodesource.com/setup_4.x | sudo -E bash -
sudo apt-get install -y nodejs

Install NPM

Install Watchman


Please see below of possible errors that you may encounter and how to resolve them. 

Install Flow

get the latest version from github (see here for the appropriate link)

wget https://github.com/facebook/flow/releases/download/v0.63.1/flow-linux64-v0.63.1.zip
unzip flow-linux64-v0.63.1.zip
sudo mv flow /usr/local/bin/flow


Install React Native 

This may have been a painful process to get to here, but this is the final step. To install react native you can install this via npm. 

sudo npm install -g react-native-cli


./autogen.sh possible errors
When you run ./autogen.sh you may get the following : 
your system lacks libtoolize

then you need to install libtool 

sudo apt-get install libtool 

and, just to be sure you may also need to install the following:

sudo apt-get install libtool m4 automake

Continue ./configure and make. 

make possible errors
Openssl development packages
When you run make you may also come across the following:


ContentHash.cpp:13:25: fatal error: openssl/sha.h: No such file or directory

 #include <openssl/sha.h>


You will need to install openssl dev, to do this you will need to execute the following :
sudo apt-get install libssl-dev 

I received a conflict in the packages and their dependencies. 

The following packages have unmet dependencies:
 libssl-dev : Depends: libssl1.0.0 (= 1.0.2g-1ubuntu11) but 1.0.2g-1ubuntu11.3 is to be installed
              Recommends: libssl-doc but it is not going to be installed
E: Unable to correct problems, you have held broken packages.

To resolve this I had to use the help of aptitude to work out a solution : 
sudo su
aptitude install libssl-dev

It provided a recommendation which I had declined and pressed no, and then it provided another recommendation that suited what I required.

The following NEW packages will be installed:
  libssl-dev{b} libssl-doc{a} zlib1g-dev{a} 
0 packages upgraded, 3 newly installed, 0 to remove and 230 not to upgrade.
Need to get 2,586 kB of archives. After unpacking 10.5 MB will be used.
The following packages have unmet dependencies:
 libssl-dev : Depends: libssl1.0.0 (= 1.0.2g-1ubuntu11) but 1.0.2g-1ubuntu11.3 is installed
The following actions will resolve these dependencies:

     Keep the following packages at their current version:
1)     libssl-dev [Not Installed]                         


Accept this solution? [Y/n/q/?] n
The following actions will resolve these dependencies:

     Downgrade the following packages:                                   
1)     libssl1.0.0 [1.0.2g-1ubuntu11.3 (now) -> 1.0.2g-1ubuntu11 (zesty)]


Accept this solution? [Y/n/q/?] y
The following packages will be DOWNGRADED:
  libssl1.0.0 
The following NEW packages will be installed:
  libssl-dev libssl-doc{a} zlib1g-dev{a} 
0 packages upgraded, 3 newly installed, 1 downgraded, 0 to remove and 230 not to upgrade.
Need to get 3,666 kB of archives. After unpacking 10.5 MB will be used.
Do you want to continue? [Y/n/?] y
Get: 1 http://archive.ubuntu.com/ubuntu zesty/main amd64 libssl1.0.0 amd64 1.0.2g-1ubuntu11 [1,080 kB]
Get: 2 http://archive.ubuntu.com/ubuntu zesty/main amd64 zlib1g-dev amd64 1:1.2.11.dfsg-0ubuntu1 [173 kB]
Get: 3 http://archive.ubuntu.com/ubuntu zesty/main amd64 libssl-dev amd64 1.0.2g-1ubuntu11 [1,352 kB]               
Get: 4 http://archive.ubuntu.com/ubuntu zesty/main amd64 libssl-doc all 1.0.2g-1ubuntu11 [1,061 kB]                 
Fetched 3,666 kB in 8s (450 kB/s)                                                                                   
Preconfiguring packages ...
dpkg: warning: downgrading libssl1.0.0:amd64 from 1.0.2g-1ubuntu11.3 to 1.0.2g-1ubuntu11
(Reading database ... 312366 files and directories currently installed.)
Preparing to unpack .../libssl1.0.0_1.0.2g-1ubuntu11_amd64.deb ...
Unpacking libssl1.0.0:amd64 (1.0.2g-1ubuntu11) over (1.0.2g-1ubuntu11.3) ...
Selecting previously unselected package zlib1g-dev:amd64.
Preparing to unpack .../zlib1g-dev_1%3a1.2.11.dfsg-0ubuntu1_amd64.deb ...
Unpacking zlib1g-dev:amd64 (1:1.2.11.dfsg-0ubuntu1) ...
Selecting previously unselected package libssl-dev:amd64.
Preparing to unpack .../libssl-dev_1.0.2g-1ubuntu11_amd64.deb ...
Unpacking libssl-dev:amd64 (1.0.2g-1ubuntu11) ...
Selecting previously unselected package libssl-doc.
Preparing to unpack .../libssl-doc_1.0.2g-1ubuntu11_all.deb ...
Unpacking libssl-doc (1.0.2g-1ubuntu11) ...
Setting up libssl1.0.0:amd64 (1.0.2g-1ubuntu11) ...
Processing triggers for libc-bin (2.24-9ubuntu2.2) ...
Processing triggers for man-db (2.7.6.1-2) ...
Setting up libssl-doc (1.0.2g-1ubuntu11) ...
Setting up zlib1g-dev:amd64 (1:1.2.11.dfsg-0ubuntu1) ...
Setting up libssl-dev:amd64 (1.0.2g-1ubuntu11) ...
Once this is done, jump out of su by using exit.

I ran make again and ran into the following error: 

  CXXLD    watchman

watchman-ContentHash.o: In function `watchman::ContentHashCache::computeHashImmediate(watchman::ContentHashCacheKey const&) const':
/home/prad/watchman/ContentHash.cpp:65: undefined reference to `SHA1_Init'
/home/prad/watchman/ContentHash.cpp:78: undefined reference to `SHA1_Update'
/home/prad/watchman/ContentHash.cpp:81: undefined reference to `SHA1_Final'
collect2: error: ld returned 1 exit status
Makefile:1566: recipe for target 'watchman' failed
make[1]: *** [watchman] Error 1
make[1]: Leaving directory '/home/prad/watchman'
Makefile:1101: recipe for target 'all' failed
make: *** [all] Error 2


so make sure to run ./autogen.sh and then ./configure and then make again

Python package requirements

I then ran into another error: 
running build_ext
building 'pywatchman.bser' extension
creating build
creating build/temp.linux-x86_64-2.7
creating build/temp.linux-x86_64-2.7/pywatchman
x86_64-linux-gnu-gcc -pthread -DNDEBUG -g -fwrapv -O2 -Wall -Wstrict-prototypes -fno-strict-aliasing -Wdate-time -D_FORTIFY_SOURCE=2 -g -fdebug-prefix-map=/build/python2.7-IY_Jmw/python2.7-2.7.13=. -fstack-protector-strong -Wformat -Werror=format-security -fPIC -I/usr/include/python2.7 -c pywatchman/bser.c -o build/temp.linux-x86_64-2.7/pywatchman/bser.o
pywatchman/bser.c:31:20: fatal error: Python.h: No such file or directory
 #include <Python.h>
                    ^
compilation terminated.

You need to install python-dev using 

sudo apt-get install python-dev 

if you run into conflicts then use aptitude again to get this resolved:
sudo su
aptitude install python-dev
exit

I ran into a problem with aptitude not installing python-dev based on the recommendation. So I had to reject the original recommendation and then aptitude suggested to downgrade the packages, so I tried that - and it worked.

and then run ./autogen.sh and then ./configure and then make again. 

Tuesday, September 5, 2017

Home Automation

The connected home and home automation is starting to gain some traction, and I'm deadly interested in being able to automate my home. On the one hand I dream of the days where our lives will be like the Jetsons, and on the other hand I'm running out of time in my life to do the small things.

There's a lot of definitions around the connected home, and I don't know whether they would all apply to me. I like to think of Home Automation as something that will give you more time in your life by automating some of the common things that you would do during a day at home.

I previously tried to do some home automation but there was a lot of fiddling around. And, the interface to control many of the devices around your home was not as user friendly. And, in a home where you are trying to convince your better half that it will make their lives easier, a simple thing such as a remote or a computer really is a hard sell.

But now, it is 2017. We now have access to a wide variety of methods to use to interface with Home Automation tools. My favorite is the Google Home or the Amazon Echo, they provide not only the voice commands to interact with a various number of devices but also enable me to interface with a wide variety of devices. This, I believe, is fundamental in having a connected home. The voice is something that many people have - and it is not something that you have to fumble around like a remote or your phone. Its quick and responsive.

Secondly, it 2017. We all would have accumulated a wide variety of smart phones over the years. Some people may have ended up selling their smartphones, trading it in, or handing it away. However, in my case I have managed to save about 5-6 smart phones (one of which is an iPhone, which I'm only using as a music player for a dock). However, these smartphones are fundamentally a computer in your pocket with a phone feature. Many of these devices are also very powerful, more powerful for what they at times needed to be. My goal is to look to re-purpose these phones as touch interfaces that I can mount to the wall etc... And to do this, I want to get rid of the exterior of phone and build out a common cohesive casing that I can place the inside components and only showing the touch interface - one that can be mounted to a wall and still look aesthetically pleasing.

Finally, it is 2017. The start ups have increased over the years. With sites such as Kickstarter and Indigogo there are many startups being able to show their ideas and also crowd source funding to launch their products. 

This series of blog posts will be dedicated towards Home Automation, I'll talk through which area that I'm looking to automate and also my thought process on the type of products.

I hope this will help others in venturing into the Connected Home/Home Automation area.

Stay Tuned.


Private Internet Access (PIA) client on Ubuntu

One of my VPN services that I regularly use is Private Internet Access. I've use it on a number of devices time to time, and I recently updated one of my laptops to Ubuntu 17.x only to find that the PIA client would freeze during connection.

After digging through a number of forums, I ran into an obscure comment where someone had a similar problem (not specifically freezing, but that it just didn't work).

The comment said that they didn't have ifconfig installed. I ran out of ideas, and thought why not give it a try. So I fired up my terminal and punched in ifconfig to see the results.

Sure enough I was told that ifconfig did not exist.

So the next step was to try and install it, I punched in

sudo apt install net-tools

Once it installed 194Kb, I tried PIA again.. and SUCCESS! it worked.

Just wished that this was mentioned in the PIA help documents.


Monday, January 4, 2016

TV Logos

Here is a site that you can use to get the logos for other international TV stations if you are using an IPTV of somesort.

http://www.thelogodb.com/


Australian TV Logos

Here is a great site for Australian TV Logos to be used with XBMC/Kodi etc...

https://github.com/AshKyd/australian-tv-network-logos

The following are available at the time of writing:
abc-news-24.png abc.png abc2.png abc3.png dig-radio.png eleven.pnggem.png go.pngnbn.png
nine.pngone.pngprime.pngsbs-two.pngsbs.png
seven-mate.pngseven-two.pngseven.pngsouthern-cross-television.pngsouthern-cross-ten.png
ten.pngwin.png

Monday, July 20, 2015

String Interpolation

String Interpolation is an interesting method of being able to access properties directly within a string. Once upon a time in order to include properties into a string you would have to do something like this :

int age = 16;
string mystr = "My age is" + age.ToString();

Essentially a string concatenation and then returning other types as a string.

Then we had string.Format which I thought it was fantastic with the autoconversion of types to string - so we had something like this:

string.Format("My age is {0}", age);


Now, this was very handy and made string concatenation simple and easy to read (have you ever encountered someone else's string concatenation and wondered wtf)?


One of the downfalls of string.Format was that you had to remember the order to add the variable. Since string.Format uses a format as {0}, {1}, {2}, etc... means that your arguements will need to be in the exact order. If you have alter your code delete a string block in the middle then you have to re-sequence everything.

String Interpolation aims solve some of these issues by allowing you to use name properties in your string. The code will look something like this :

int age = 16;
string mystr = $"My age {age}";

Notice, the "$" in front of the string, and also note that the property is surrounded by parenthesis.

Null Conditional Operators

I cannot count the number of times that I've faced exception caused by running into a null. This then leads to code using the if{} blocks or using the short hand "?" on almost all of your variables.

In C# 6.0 specification a null conditional operator. The null conditional operator allows you to check for the instance of a null and replace a returned value or to return a value.

For example :

If you have a simple class such as a Person :

public class person
{

public string Name {get;set;}

public int Age {get; set;}

}

and you instantiate the class :

person me = new person();


then if you do something like

Console.Writeline(me.Name);


you'll get a null exception since the Name has not been instantiated. Often to overcome this specific problem we use constructors :

public class person
{

public string Name {get;set;}

public int Age {get; set;}

public person()
{
Name = "";
Age = 0;
}

}

The Null Conditional Operator now allows you to check for the null based on a shorthand, and this is how it would look in use:

Console.Writeline(me?.Name ?? "Empty Name");

So lets look at what this is doing, the first item to look at is "me?.Name" which is essentially checking the object me to see if it is null, if it is not null it will look at the Name property. The second part is '?? "Empty Name"' which is basically stating that if any part of the expression is null then use the string "Empty Name".

This shorthand example is very important and useful in order to make your program less verbose. For example in order to the above single line you would have had to do multiple if{} blocks (first to check that me is not null, and then the Name property is not null.


Tuesday, June 9, 2015

Xamarin.Auth Sample How to

Introduction


I wanted to try out Xamarin.Auth and specifically have authentication for my App with Facebook. I downloaded the Xamarin.Auth from https://github.com/xamarin/Xamarin.Auth and I thought that this would be a simple build and run to check it out. However, it became slightly long winded process than the simple build and run. In this post I'll go through the steps that I went through.

1. Downloading the Sample

To get the sample application go to https://github.com/xamarin/Xamarin.Auth and download the a copy of the master. A button on the right hand side "Download Zip" will download a copy of the master.

Once this is downloaded, unzip the file to your preferred location. This will extract the contents, within the contents navigate to Xamarin.Auth-master\samples\Xamarin.Auth.Sample.Android and you'll find a solution file (.sln). Double click on the solution file to open it in your IDE (either Visual Studio or Xamarin Studio, in this post I'll be using Visual Studio 2013).

2. Doing the initial Setup

Once the solution file is open try and build and run the project, if you receive an error with the SDK version then follow these steps :


  1. Right click the project "Xamarin.Auth Sample(Android)
  2. Make sure that the Application tab is selected
  3. Update the values for Compile using Android version, Minimum Android to target, Target Android version.
For me I have the API Level 21 installed which is Lollipop (version 5.0x).


Once you have done this you may run into a problem stating "The Debugger Cannot Continue Running the Process. Unable to Start Debugging". If you do see my post on how to resolve this. 

Now, build and run your application. 


You'll be presented with two buttons within the app. If you click either of them you'll receive an error in the authentication. This is all good, since you have set up the authentication with your IDs...

3. Setting Up the Authentication

Now, to set up the authentication you need to register the application with Facebook to get an Application ID. In this step we will primarily focus on the facebook registeration, this is also assuming that you have an existing facebook account (e.g business or personal). In the following example I'll be using my personal account. 

When you examine the code in MainActivity.cs you'll notice the places where you will need to enter values from facebook. 


For example the line that states clientId: "App ID from https://developers.facebook.com/apps",  is your first hint. 

So, head over to developers.facebook.com/apps to start to create your application ID. If you have created an ID before then you can probably skip this step. If you haven't created a facebook application ID specifically for Android then you should read this through.

Click on the + Add a New App button, currently this is green in color in the top right. 

You'll be presented with an in-window dialog requesting for the type of application, in our case since we are trialing out the Xamarin.Auth for Android we'll need to select Android.

Once you click on the Android button, you'll be presented with the following window. 


At this point you can set up a proper application ID, with all the hash keys etc... however, since this is a sample we can skip all of this. Click on the button on the top right called "Skip and Create App ID". This will do a quick create, and present the following dialog: 

 What you will need to enter is the Name, Namespace, and you will need to choose the category. You can enter a dummy information to get you started, please note that the category is mandatory to be completed. Once you have entered all the information click on Create App ID

Once you have done this, you will be taken to a page for your application. Here you will find the application ID. Copy the application ID from the page and paste it in the MainActivity.cs so that the code reads as follows clientId: "1682369x1198632x",  (please note that I removed a character and replaced it with x).

Once you have updated this field, build the solution and run it. When you click on the button to login you'll be presented with another error:


Now that you've got this far, you'll need to head back to facebook. If you haven't closed down the window where you got the App ID, then simply click on the Settings tab on the right hand side. This will take you to the settings page, now you may need to scroll down to the bottom and you'll notice a button called + Add Platform.

You'll be presented with a dialog, select Android again. Now, click on the Quick Start button, because this will guide you through the process. 

Once you have clicked on Quick Start button you'll be presented with the following page:

This will guide you through implementing the facebook sdk to your project etc... but for our use we can skip all of these steps and head over to App Info. You can click directly on the progress breadcrumbs or scroll all the way down. 

From here you will need to enter the package name and the activity name. For the package name, go to your solution and right click > Properties > Application (tab if it is not already selected). Either copy the Assembly/Namespace or update it to whatever you want. 

Paste the copied namespace/assembly, in the packagename. 

For the activity name, use your package name and then add .MainActivity  so that it reads something like com.xamsamples.auth.MainActivity

Once you click on Next, the package name will be checked against google and a warning message will be displayed. This is to try and minimise errors of incorrect package names, since we are only looking to try out a sample we can ignore this, click on Use this package name.

4. Generating Hash Keys


You will now be taken to generate hashkeys, you will only need to generate the development hashkey. 

To generate the hashkey, you will need to download openssl - you will need to download the correct version according to your OS :
  • 32 bit version (https://code.google.com/p/openssl-for-windows/downloads/detail?name=openssl-0.9.8k_WIN32.zip)
  • 64 bit version (https://code.google.com/p/openssl-for-windows/downloads/detail?name=openssl-0.9.8e_X64.zip&can=2&q=)
The above links for Windows, extract the requried zip file to something such as c:\openssl

Once this is done, open up command.exe ( Windows + R, then type cmd and press enter). 

You'll need to detect the debug.keystore file path. To do this, type the following commands to search for it :

cd \
dir debug.keystore /s

You may get results for two files, one in .android directory and one within Xamarin\Mono for Android. The full path may be something like this C:\Users\username\AppData\Local\Xamarin\Mono for Android 

Next you need to locate the keytool location. Similar to the above step search for it using the following command:

dir keytool.exe /s

You'll get a number of hits depending on the java versions you have installed. Get the latest versions keytool.exe for me it is located at C:\Program Files (x86)\Java\jre7\bin 

Now navigate to the keytool directory just to make things easier. 

cd C:\Program Files (x86)\Java\jre7\bin

Now you will need to execute the keytool.exe using the debug.keystore and openssl to generate the hashkey. To do this execute the following, you must first update this with the paths relevant for you:


C:\Program Files (x86)\Java\jre7\bin>keytool -exportcert -alias androiddebugkey
-keystore "C:\Users\username\.android\debug.keystore" | "C:\openssl\bin\openssl" sha
1 -binary |"C:\openssl\bin\openssl" base64


The main area you will need to update is the path to the debug.keystore, if you installed openssl in c:\openssl then you don't need to change anything else. Once you execute this command you will receive a prompt requesting for a password. This is a password used to generate a hash key, so enter what you would want. 

A hashkey will be generated, simply copy this key (if you are using the command window then right click and select Mark and then highlight the key, then press enter). Now, go to the facebook page where it requested for a hashkey and paste the copied key in to the field called Development Key Hashes.

When you click Next, you've now completed everything. Facebook will provide additional information on the facebook.sdk which you can ignore for now. 

Think you are done ? well build and run the application now that you have the App ID in your application. You'll soon be presented with the following error:


This is the same error as before, nothing has changed (?). Ok, you need to do one more step to get this to work. Go to facebook into your application > setting and you may notice at the top there are three tabs. One of which is Advanced. Click on Advanced and scroll down to OAuth Settings and then paste in http://www.facebook.com/connect/login_success.html into the Valid OAuth Redirect Uris this should be the same as the redirectUri in your code. If it is anything different, copy and paste whatever you have in your code in to the   Valid OAuth Redirect Uris. 

While you are in the dashboard, double check the Hashkey to make sure that it has saved. If it has, then everything is all good - and you should be good to go.

Now, Rebuild your app and run it. 


There you have it, you now have Xamarin.Auth sample application running (as you can see I have edited the last image protect privacy, it essentially displayed your facebook name).

Final

This has been a long post, and almost all of it had to do with facebook registration, once you have the app id and facebook setup you simple need to replace app id in your code and execute the application. Unfortunately the documentation on Xamarin and also on github didn't indicate what you had to do, or provide documentation on setting up facebook. 

I hope this has helped someone. 


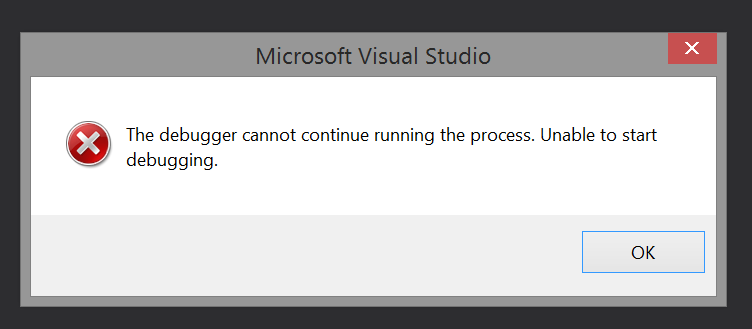
The Debugger Cannot Continue Running the Process. Unable to Start Debugging

While I've been working with Xamarin I have noticed some frustrating errors from Xamarin Studio and now with Visual Studio.

I was looking into Facebook Authentication and downloaded the master of Xamarin.Auth and tried to run the sample apps included and ran into a strange error:


Looking at the error it was hard to work out what went wrong, so I reverted to a friend to help with this.

The Fix


The solution contained two projects :

  1. Xamarin.Auth Sample (Android)
  2. Xamarin.Auth.Android
If you have the incorrect project setup as the startup project, in this case it is Xamarin.Auth.Android then you will get the error message. To fix this follow these steps:
  1. Right click on the Solution and goto Properties (it should be the last option or press Alt+Enter)
  2. Update the startup project to the project that should be starting up


I hope this helped.