Introduction
I wanted to try out Xamarin.Auth and specifically have authentication for my App with Facebook. I downloaded the Xamarin.Auth from https://github.com/xamarin/Xamarin.Auth and I thought that this would be a simple build and run to check it out. However, it became slightly long winded process than the simple build and run. In this post I'll go through the steps that I went through.
1. Downloading the Sample
To get the sample application go to https://github.com/xamarin/Xamarin.Auth and download the a copy of the master. A button on the right hand side "Download Zip" will download a copy of the master.Once this is downloaded, unzip the file to your preferred location. This will extract the contents, within the contents navigate to Xamarin.Auth-master\samples\Xamarin.Auth.Sample.Android and you'll find a solution file (.sln). Double click on the solution file to open it in your IDE (either Visual Studio or Xamarin Studio, in this post I'll be using Visual Studio 2013).
2. Doing the initial Setup
Once the solution file is open try and build and run the project, if you receive an error with the SDK version then follow these steps :- Right click the project "Xamarin.Auth Sample(Android)
- Make sure that the Application tab is selected
- Update the values for Compile using Android version, Minimum Android to target, Target Android version.
For me I have the API Level 21 installed which is Lollipop (version 5.0x).

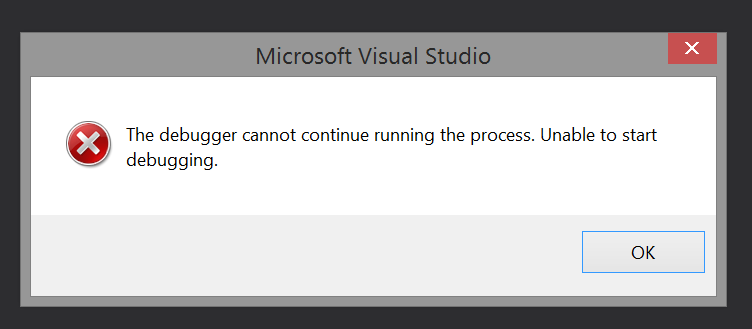
Once you have done this you may run into a problem stating "The Debugger Cannot Continue Running the Process. Unable to Start Debugging". If you do see my post on how to resolve this.
Now, build and run your application.


You'll be presented with two buttons within the app. If you click either of them you'll receive an error in the authentication. This is all good, since you have set up the authentication with your IDs...
3. Setting Up the Authentication
Now, to set up the authentication you need to register the application with Facebook to get an Application ID. In this step we will primarily focus on the facebook registeration, this is also assuming that you have an existing facebook account (e.g business or personal). In the following example I'll be using my personal account.
When you examine the code in MainActivity.cs you'll notice the places where you will need to enter values from facebook.

For example the line that states clientId: "App ID from https://developers.facebook.com/apps", is your first hint.
So, head over to developers.facebook.com/apps to start to create your application ID. If you have created an ID before then you can probably skip this step. If you haven't created a facebook application ID specifically for Android then you should read this through.
Click on the + Add a New App button, currently this is green in color in the top right.
You'll be presented with an in-window dialog requesting for the type of application, in our case since we are trialing out the Xamarin.Auth for Android we'll need to select Android.

Once you click on the Android button, you'll be presented with the following window.

At this point you can set up a proper application ID, with all the hash keys etc... however, since this is a sample we can skip all of this. Click on the button on the top right called "Skip and Create App ID". This will do a quick create, and present the following dialog:

What you will need to enter is the Name, Namespace, and you will need to choose the category. You can enter a dummy information to get you started, please note that the category is mandatory to be completed. Once you have entered all the information click on Create App ID.
Once you have done this, you will be taken to a page for your application. Here you will find the application ID. Copy the application ID from the page and paste it in the MainActivity.cs so that the code reads as follows clientId: "1682369x1198632x", (please note that I removed a character and replaced it with x).
Once you have updated this field, build the solution and run it. When you click on the button to login you'll be presented with another error:

Now that you've got this far, you'll need to head back to facebook. If you haven't closed down the window where you got the App ID, then simply click on the Settings tab on the right hand side. This will take you to the settings page, now you may need to scroll down to the bottom and you'll notice a button called + Add Platform.
You'll be presented with a dialog, select Android again. Now, click on the Quick Start button, because this will guide you through the process.
Once you have clicked on Quick Start button you'll be presented with the following page:

This will guide you through implementing the facebook sdk to your project etc... but for our use we can skip all of these steps and head over to App Info. You can click directly on the progress breadcrumbs or scroll all the way down.
From here you will need to enter the package name and the activity name. For the package name, go to your solution and right click > Properties > Application (tab if it is not already selected). Either copy the Assembly/Namespace or update it to whatever you want.
Paste the copied namespace/assembly, in the packagename.
For the activity name, use your package name and then add .MainActivity so that it reads something like com.xamsamples.auth.MainActivity
Once you click on Next, the package name will be checked against google and a warning message will be displayed. This is to try and minimise errors of incorrect package names, since we are only looking to try out a sample we can ignore this, click on Use this package name.
4. Generating Hash Keys

You will now be taken to generate hashkeys, you will only need to generate the development hashkey.
To generate the hashkey, you will need to download openssl - you will need to download the correct version according to your OS :
- 32 bit version (https://code.google.com/p/openssl-for-windows/downloads/detail?name=openssl-0.9.8k_WIN32.zip)
- 64 bit version (https://code.google.com/p/openssl-for-windows/downloads/detail?name=openssl-0.9.8e_X64.zip&can=2&q=)
Once this is done, open up command.exe ( Windows + R, then type cmd and press enter).
You'll need to detect the debug.keystore file path. To do this, type the following commands to search for it :
cd \
dir debug.keystore /s
You may get results for two files, one in .android directory and one within Xamarin\Mono for Android. The full path may be something like this C:\Users\username\AppData\Local\Xamarin\Mono for Android
Next you need to locate the keytool location. Similar to the above step search for it using the following command:
dir keytool.exe /s
You'll get a number of hits depending on the java versions you have installed. Get the latest versions keytool.exe for me it is located at C:\Program Files (x86)\Java\jre7\bin
Now navigate to the keytool directory just to make things easier.
cd C:\Program Files (x86)\Java\jre7\bin
Now you will need to execute the keytool.exe using the debug.keystore and openssl to generate the hashkey. To do this execute the following, you must first update this with the paths relevant for you:
C:\Program Files (x86)\Java\jre7\bin>keytool -exportcert -alias androiddebugkey
-keystore "C:\Users\username\.android\debug.keystore" | "C:\openssl\bin\openssl" sha
1 -binary |"C:\openssl\bin\openssl" base64
The main area you will need to update is the path to the debug.keystore, if you installed openssl in c:\openssl then you don't need to change anything else. Once you execute this command you will receive a prompt requesting for a password. This is a password used to generate a hash key, so enter what you would want.
A hashkey will be generated, simply copy this key (if you are using the command window then right click and select Mark and then highlight the key, then press enter). Now, go to the facebook page where it requested for a hashkey and paste the copied key in to the field called Development Key Hashes.
When you click Next, you've now completed everything. Facebook will provide additional information on the facebook.sdk which you can ignore for now.
Think you are done ? well build and run the application now that you have the App ID in your application. You'll soon be presented with the following error:

This is the same error as before, nothing has changed (?). Ok, you need to do one more step to get this to work. Go to facebook into your application > setting and you may notice at the top there are three tabs. One of which is Advanced. Click on Advanced and scroll down to OAuth Settings and then paste in http://www.facebook.com/connect/login_success.html into the Valid OAuth Redirect Uris this should be the same as the redirectUri in your code. If it is anything different, copy and paste whatever you have in your code in to the Valid OAuth Redirect Uris.
While you are in the dashboard, double check the Hashkey to make sure that it has saved. If it has, then everything is all good - and you should be good to go.
Now, Rebuild your app and run it.


There you have it, you now have Xamarin.Auth sample application running (as you can see I have edited the last image protect privacy, it essentially displayed your facebook name).
Final
This has been a long post, and almost all of it had to do with facebook registration, once you have the app id and facebook setup you simple need to replace app id in your code and execute the application. Unfortunately the documentation on Xamarin and also on github didn't indicate what you had to do, or provide documentation on setting up facebook.
I hope this has helped someone.